Sunday, January 11, 2009

Kennewick hat pattern


Kennewick
by Megan McDermott

Difficulty: Advanced Beginner - Intermediate

Traveling takes you through some memorable places. My adventure that brought me from sunny California to snowy Idaho drove me through the city of Kennewick, Washington. Looking at a map of the journey later on,I noticed the Columbia River curves through that area just like a snake cable.

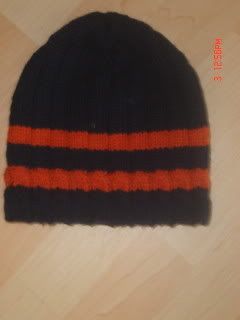
Worked in the round, this hat pattern features two ribbing sequences, cables and a spiral decrease crown shaping. It works up fairly quickly and won't bore you.
Photo credit [model: Dave Marshall; photographer: Megan McDermott]


SIZE
One size fits most adults

FINISHED MEASUREMENTS
head circumference: 22”
length: 6”
MATERIALS
Naturally Tussock Aran weight 10-ply [85% New Zealand Wool 15% polyester effect, 100g]; 1 skein
[MC] #173

1 set US 8/5mm double-point needles
1 12- inch US 7/4.5 mm circular needle
1 16-inch US8/5mm circular needle

notions required
stitch marker
cable needle
measuring tape
tapestry needle
GAUGE
5 sts/20 rows = 4" in stockinette stitch

PATTERN NOTES
The direction of the cable switches with each sequence, alternating from a left facing cable to a right facing cable.

2x1 rib (Worked over a multiple of 5 sts):
round 1: [K2, P1] to end.
Repeated for all rounds.

Seed Stitch Rib (Worked over a multiple of 5 sts):
Round 1: K all sts.
Round 2: [K4, p1] to end.
Repeat these 2 rounds for Seed Stitch Rib.

PATTERN

Brim
Using US 7/4.5 mm needles, CO 111 sts, being careful not to twist, join, place marker. Work in K2,P1 rib for 1 inch.

Body
Switching to US 8/5mm needles, work one round even, knitting all sts.
Work 10 rows of seed stitch rib, ending on a K4,P1 row

Snake Cable sequence:
Row 1: sl 2 onto cable needle facing away from you, K2, K2 off of cable needle, K1
Rows 2-9: work seed stitch rib ending on a K4, P1 row
Row 10: sl 2 onto cable needle facing towards you, K2, K2 off of cable needle, K1
Row 11-17: work seed stitch rib ending on a K4,P1 row

repeat this sequence until the body of the hat measures 6 inches from CO edge.

Work one round even, knitting all sts.

Crown
Standard Spiral shaping

row 1: *K10, K2tog*
row 2 and all even numbered rows: K all
row 3: *K9, K2tog*
row 5: *K8, K2tog*
row 7: *K7, K2tog*
row9: *K6,K2tog*
row 11: *K5, K2tog*
row 13: *K4, K2tog*
row 15: *K3, K2tog*
row 17: *K2, K2tog*
row 19: *K1, K2tog*
row 21: *K2tog*

FINISHING
Leaving a 12 inch tail, break yarn and pull through live sts, secure and weave in all ends, block if desired.

ABOUT THE DESIGNER
Megan first picked up knitting in High School out of curiosity and a need to keep her ever-working mind occupied and stimulated. When not knitting, yarn-dyeing or yarn hoarding, you can find her chasing after her future yarn-adoring toddler and running Colorful Tea, her small knit-wear shop online or blogging at leftknits.blogspot.com.

Saturday, November 22, 2008

nearly the end of the design quarter...

and I'll be happy that it's done, but quite sad too. I've learned and designed a lot, stretched my creative limits and knitted my creative juices dry more than a couple of times. I learned how to prioritise my multiple roles in life, being a housewife-ish, mom and knitwear designer.

This design quarter I've created.....

I'll have to find my binder that has all this in it, then post a slideshow of pictorial knitted goodness.

Friday, June 20, 2008

KIPs...

taking a break from the baby knits...moving in 6 days, still haven't packed...

so that means, while languorously waiting for my house to not be such an oven and waiting for my mom to get back from being out so I can pack, I've got a few KIPs!

~Branching out scarf forMy Sister, Sarah's graduation from Nursing college /birthday present.

~Manly scarf of my own design for my boyfriend, Mike's birthday.

Monday, April 14, 2008

Legs Up Longies Pattern!


y'all asked for it, here it is!

Legs Up Longies Pattern
Longies Knitted from the legs up!
Pattern created by: Megan McDermott ~ WAHM Owner and Proprietoress of Colorful Tea. dated: December 2, 2007
This knitting pattern is a free pattern for home use only. Donations are always appreciated to help continue making patterns like this one available to you for your knitting adventures!

Knitting level: Intermediate - Advanced

You should be comfortable with: The Knitting Basics, knitting according to measurements and gauge, joining MC and CC yarns (optional), joining and working in the round, short rows, increasing, decreasing, joining pieces with knitting and finishing techniques.

Tools needed:
(2) pair of US size 8 (metric 5mm) 12" or 16" circular needles
(1) pair of US size 6 (metric 4mm) 12" or 16" circular* needles
(1) pair of US size 9 (metric 4.5mm) Double Pointed Needles
(1) Tapestry needle
(1) Measuring tape

* You can substitute 6" Double Pointed Needles for the circulars

Measurements needed for pattern: Thigh, Inseam, Rise and Hip. Please be sure to take these over a typically worn diaper! In the instances of measurements that aren't whole numbers, simply round up to the nearest inch. All measurements need to be multiplied by the Stitches Per Inch from your gauge swatch of the yarn you've chosen to work with.

This pattern can be modified to make Shorties and Capris. This pattern is intended for straight-legged pants types at this time. I will update the pattern with flared-leg and ruffle-bottomed legs sequences soon!

Pattern:

Legs
Using your Thigh measurement multiplied times your SPI, CO ___ stitches with CC. Purl one row working straight, begin cuff detail of your choice for desired amount of cuff.
(examples: Seed Stitch: k1p1 row, p1k1 row; Moss Stitch: k2p2 row, p2k2row; purly: knit all rows if working flat, knit 1 row, purl 1 row if working in the round)

Purl one row even, at the end of this row, connect MC, join and place marker.
Work even until you meet your inseam measurement.

Repeat entire sequence for other leg.

Joining for the body
Matching up the markers from both legs so that they're facing each other on the inside, you're ready to join for the body.

using a piece of scrap yarn, chain 12. using your dpn's, do a provisional CO for 10 stitches. work in stockinette stitch for 4 rounds, joining the last round with the leg closest to the working yarn. k2 tog.
work to the other side of the starting leg, unzip the provisional cast on very carefully and place live stitches on the needle that has the unworked stitches on it.
work this sequence for one round: k2 tog, knit4, place marker, knit 4, k2 tog, knit leg to other side, k2 tog, knit 4, place marker, knit 4.

work even for 1.5"
begin crotch gusset shaping in reverse. The decrease sequences are done twice per row, one at the front and one at the back.
k2 tog, k4, pass marker, k4,k2 tog
knit one row
k2 tog, k3, pass marker, k3, k2 tog
knit one row
k2 tog, k2, pass marker, k2, k2 tog
knit one row
k2 tog, k1, pass marker, k1, k2 tog
knit one row

work even for 2", placing markers at 1/4 and 3/4 around for your short rows.
knit one row
knit to 1/4 marker, pass marker, k2 tog, knit to 3/4 marker, pass marker, k2 tog
knit one row
*work short row
knit three rows*
** repeat for desired amount
knit one row
knit even until 1 row away from completing the body of your pants, complete the following decrease sequence if desired once the short row markers have been removed.

work for one round:*k2 tog, knit 10* (** repeat until end of round at the back marker)

knit to front marker.
Join CC yarn, switching over to your US size 6 (metric 4mm) knit one row
begin working in chosen rib pattern.
If you're using a k2p2 rib, work for one inch, then do one eyelet row, return to working in the k2p2 rib for one more inch
eyelet sequence:* make 1, k2tog, purl 2*
Using your US size 9 (metric 4.5 mm), bind off in rib sequence

Weave in all ends using your tapestry needle or size F (or smaller) crochet hook

work drawstring as desired, weave in through eyelets.

Knitterbio:
Megan McDermott is a Work at Home Mom who's brand new to the Coeur D'Alene area. She owns a small e-commerce business called Colorful Tea and she loves knitting, being a "crunchy mom", creatively working in a caffeinated blur and living life in colour.

Keep your eyes peeled for more patterns, knitted goodies and more!

Happy Knitting!


This pattern is for personal use only, not for commercial use. If you'd like to use this pattern for commercial use, please feel free to e-mail me at colourfultea@gmail.com to inquire about licensing.

thank you!


Saturday, February 9, 2008

Love and Football knitted hat pattern version 1.0


Love and Football version 1.0

knit pattern for a one size fits most hat with roll brim variation


Pattern created by: Megan McDermott, proprietoress of Colorful Tea
pattern finally typed on: November 10, 2007

Pattern recommended for: all knitters
Knitter should be comfortable with: working in a rib pattern, working with cable stitches, in the round as well as working with more than one colour and sewing seams to finish object.

Tools and notions:
(1) pair of US size 8 (metric 5mm) 16" circular needles
(1) set of US size 8 (metric 5mm) Double pointed needles
(1) cable needle (if you don't have one, you can use a spare DPN)
(1) stitch marker
(1) Tapestry needle
(1) Measuring tape
(4) knitting straight pins

Gauge: 5 sts per inch x 6 rows per inch on US size 8 (metric 5mm) needles using Cascade 220 (100% Peruvian highland worsted weight wool yarn)

MC: 1 skein of Cascade 220 in your choice of colour. I used Navy blue
CC: 1 skein of Cascade 220 in your choice of colour. I used Pumpkin orange.

Body of the hat:

CO 104 stitches in MC, working in a k4 p1 rib until end, join and place marker at beginning of round.
Work k4 p1 rib for 1 inch (2 inches if you're adding a roll brim). At the beginning of the next round, start working a basic 2x2 rope cable.
Note that if you're uncomfortable working a cable, you can omit it from the pattern.

work cable as follows:
Slip two stitches onto your cable needle, let these stitches fall away from you, knit two, knit the cable stitches, purl 1. repeat until end of round

Join CC, work in k4 p1 for 1 inch

Work cable for one round, rejoin MC

work even in k4 p1 until hat measures 5" or desired height from the CO edge

Top of the hat:
Using your DPNs, separate stitches into 4 groups of 26. Working with one group of 26 at a time, work them as follows:

knit across 26 stitches
purl 1, ssp, purl to end
knit, ssk, knit to end
repeat these two rows until there are 15 stitches remaining
knit even
purl even
repeat these two rows twice
Bind off
repeat this for the 3 remaining groups of 26.

Finishing:
Turn the hat inside out, join the side seams with your knitting straight pins. Using a tapestry needle and the MC yarn, sew up the seams until you reach the top. You'll be sewing up the top of the hat separately. Once the side seams are sewn up, for the top into an X shape and sew it up.

Weave in any loose ends and trim any excess yarns.

If you want to block your hat, do it now.

Done!

Knitterbio:
Megan McDermott is a Work at Home Mom who's brand new to the Coeur D'Alene area. She owns a small e-commerce business called Colorful Tea and she loves knitting, being a "crunchy mom", creatively working in a caffeinated blur and living life in colour.

Keep your eyes peeled for more patterns, knitted goodies and more!

Happy Knitting!


This pattern is for personal use only, not for commercial use. If you'd like to use this pattern for commercial use, please feel free to e-mail me at colourfultea@gmail.com to inquire about licensing.

thank you!


Monday, January 7, 2008

knits and procrastination

Dear blogger:

I know I was supposed to write a series of tutorials on how to get started knitting from the left-handed knitter's perspective. and then I got caught up in my ever-present list of knitting work and didn't get around to taking pictures for a step by step. blarghie.

So I'll at least tell you what I'm exactly working on, okay?

~Customs~
2 pairs of socks
4 pairs of gloves/mittens
2 hats

~Instock for the Shops~
1 pair of longies
1 pair of shorties
1 hand-embroidered soaker
2 YYMN slots
1 knitting tote with matching needle roll
~ coordinating mug cozy
~ coordinating hand-dyed yarn x2 skeins (DONE)

Thursday, December 27, 2007

leftknits!

Hey there knitpeople!

I'm starting this blog as a place for you to learn, share, get our knit on and master the Needle Fu.

This coming week's block of entries is devoted to the basics from the left-handed perspective.

Happy knitting y'all!